You can save money and paper by finding out how to print twice as much on your Mac.
Double-sided printing is an excellent option if you want to save money, are concerned about the environment, or simply don’t like constantly running out of paper. Duplex printing is another name for double-sided printing. However, we print less frequently than ever before, to the point where many people don’t know how to print front and back on Mac, resulting in the use of twice as much paper.
Don’t worry, this article will show you how to enable double-sided printing on a Mac when you’re using an application or browsing the web.
How to Print Double-sided on Word on Mac?
Since it produces its own unique printing dialog window, Microsoft Word (or any other Microsoft Office software) behaves a little differently than many other apps, which can be confusing at first if you’ve ever printed anything on a Mac.

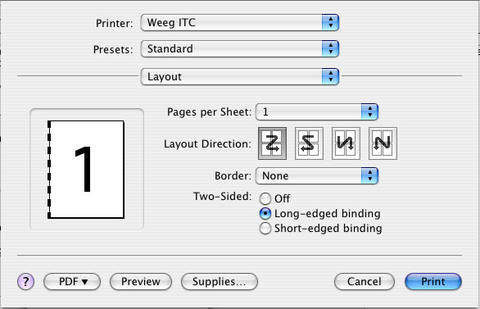
So here’s how to print double-sided on Mac in Word:
- Navigate to File in the menu bar ➙ Print
- Click Copies & Pages and then Layout
- Select Two-Sided ➙ Long-Edge binding
- Hit Print
You might ask, “Describe long-edge binding.” The distinction between a long edge and a short edge is comparable to the binding style between a regular book and a lab notebook. Do the long and short edges flip over, in other words? The general consensus is to switch on long edge for the majority of long-form documents, though ultimately it comes down to preference.
Since it was mentioned that Microsoft Office applications have a somewhat unique printing procedure, it’s important to know that most Mac programs invoke a common printing dialog box. To see the difference, here’s how to print double-sided PDFs:
- Open File in the menu bar ➙ Print
- Simply check the Two-Sided box in the new window
- To finish, simply click Print.
Using the Print shortcut + P, which works in almost all circumstances, is an additional helpful tip to save you a few extra clicks.
How to Print Double-sided on Google Docs on Mac?
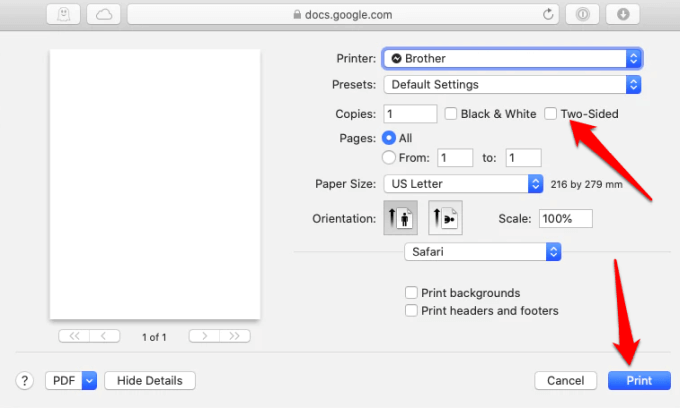
The process described in “How to print double-sided PDFs” can be used for double-sided printing online as well. Whether you use Google Chrome, Firefox, Safari, or another browser, they all make use of the standard macOS printing dialog box. Here’s how to get to it:

- Go to File in the Google Docs menu and then Print (or use a shortcut ⌘ + P)
- Check the Two-Sided box next to the Copies
- Press Print
This process can be used with virtually every web app (and even website) out there, not just Google Docs.
How to Double-sided Printing Tricks for a Non-duplex Printer?
Use both sides of the paper even if your printer’s feeder cannot handle double-sided printing. With a little extra work, you can make your documents print double-sided.

- The document you want to print two-sided must be opened in the Print window.
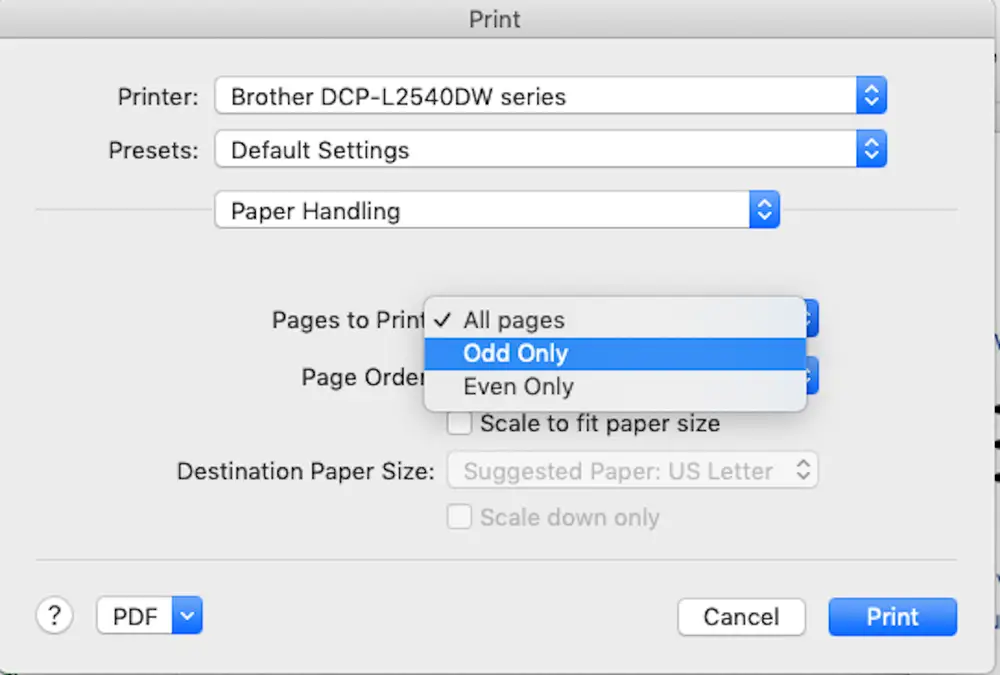
- Click on the box below Presets or Orientation and choose “Paper Handling”.
- Click the box next to “Pages to Print.” “All Pages” is the default. Change that to “Odd Only.”
- You’ll get pages 1, 3, 5, etc. when you print your document.
- Place the reverse side of the printed pages in the paper tray after turning them over.
- Return to the Print window and select the Paper Handling menu.
- For Pages to Print, choose “Even Only.”
- The even pages of your document will print on the reverse of the odd pages when you print it.
As you learn how to load the odd pages correctly to print double-sided, this method may require some trial and error. Before printing a lengthy document, try experimenting with a few pages first.

