Learn how to scroll down on MacBook Air in four ways to help you work easily.
If your MacBook Air doesn’t come with an external mouse, you might have had trouble viewing a website or any other document. The trackpad, space bar, keyboard arrows, and/or an external mouse can all be used to scroll down on a Mac.
We’ll go over a few quick ways to scroll on a MacBook Air in the hopes that it will enhance your use of the device.
Scrolling on Your MacBook Air
On your MacBook Air, you can scroll in a variety of ways. Some of these methods are listed below.
- Scroll using the keyboard keys
- Scroll using the touchpad
- Scroll using the scroll bars
Scroll Using the Keyboard Keys
Using the up, down, left, and right keys on your MacBook Air keyboard is the most typical method for scrolling. Because some information will always be at the screen’s edge, there is a chance that if you choose this option you will miss some of the specifics of whatever you are watching.
Furthermore, in order to use these keys, you typically first need to click in the area where you want to scroll.
On a MacBook Air, you can scroll by pressing the function key and either the up or down key while simultaneously pressing the page up or page down key. These keys will move to either the start of the page in case of the “fn+up” key or can move to the ends of the page in case of the “fn+down” key. Let’s now proceed to the next scrolling technique.

Scroll Using the Touchpad
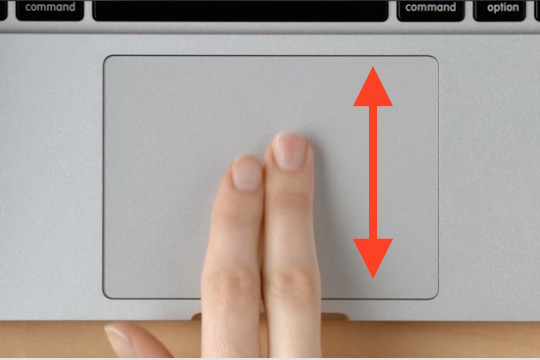
We’ll demonstrate how to scroll using the touchpad on your MacBook Air since some of you might not be familiar with this technique. Using two fingers, slowly drag them upward to move down and downward to move up on the MacBook screen. Your finger must be moved downward in order to move up, though.
Additionally, to scroll to the left on your MacBook Air, place two fingers in the middle of the trackpad and slowly move them to the left. The same procedure should be followed to scroll to the right.
On your MacBook Air, this is one of the simplest ways to scroll, and you can do it with either your right or left hand, depending on which is more comfortable for you.
Scroll Using the Scroll Bars
Using the scroll bar on your MacBook Air is another option for scrolling. This bar typically appears at the top right corner of your browser, document, or folder on your computer. However, by default, if your mouse cursor is not where the scroll bar should be, the scroll bar will vanish.
So, you can change the settings of the scroll bar appearance by going into the Setting in the System Preferences for general use.
The following three scroll bar display options are: Automatically based on mouse and trackpad movements when scrolling; Manually based on mouse and trackpad movements.
When you click anywhere on the scroll bar, you will see another two sets of options that can be used to set the position of the page you are currently viewing. You can choose any one of the options that may be suitable for you.
Once more, you can choose any of the options based on your usage. According to the first and second options, the scroll will advance one page at a time, respectively, to the position on the page you are currently viewing that corresponds to the location where you clicked the scroll bar.
There are two following ways by which you can use the scroll bar for scrolling on your MacBook Air:
- To scroll left or right, perform a left click on the scroller and then begin moving your next finger up or down on the trackpad. To scroll left or right, repeat the process but switch the direction in which your finger moves. Remember that the scroll bar is at the bottom of the screen for horizontal movement and at the very right of the screen for vertical movement.
- Simply click on the comparable location on the scroll bar to move your page to that location if you want to go to a specific location on the page you are currently viewing.
Scroll Using External Mouse on Mac

Using an external mouse, there are two ways to scroll on a Mac.
Vertical Scroll With Mouse Wheel
Additionally, you can connect an external mouse to a MacBook Pro or MacBook Air. However, since most modern MacBooks require USB Type-C connectors, and since most external mice use USB Type-A, make sure you have the appropriate adapters.
Use the scroll wheel to move up or down, just like with any other external mouse.
Scroll Horizontally With Mouse Wheel
By holding down the SHIFT key while using the mouse wheel to move up or down, you can scroll horizontally with the mouse.
- Scroll left on Mac = SHIFT + Mouse Wheel Up
- Scroll right on Mac = SHIFT + Mouse Wheel Down
Changing Your MacBook Scrolling Preferences
The trackpad setup on the MacBook is by default reversed, including the scrolling direction. Changing this configuration in your mouse settings is an option if you find it difficult to get used to it.
- Head over to the ‘Apple logo’ in the top left corner of your screen
- Click on ‘System Preferences’
- To access your mouse settings, click “Trackpad.”
- Go to “Scroll and Zoom,” uncheck the box next to “Scroll Direction: Natural,” and the setting will be changed for you.

