There is no doubt that taking a screenshot on Mac is quite straightforward because Apple has made it simple to do that. However, a lot of users have complained that they have encountered a “screenshot on Mac not working” problem.
One of these fixes should enable the screenshot functionality on your Mac, whether you prefer to use the tried-and-true keyboard shortcuts for this purpose or would rather use the Preview app or the Screenshot app (in Mojave or later). Please read this article carefully.
What Is A Screenshot?
The term “Screenshot” is also known as a snapshot or screen capture, or print screen. The information on your computer display is depicted in this image. Simply put, it enables you to record whatever is displayed on your device’s screen. After taking a screenshot, you can save it as an image file that you can then edit. You may be interested in How To Crop A Screenshot On Mac?
Since it is currently quite useful, the screenshot feature is available on all modern electronic devices, including smartphones, computers, and tablets. When you need to share the screenshot with others or give software reviews, for example, the feature comes in very handy.
How Do You Screenshot On A Mac?
You must first understand how to capture a screenshot on a Mac in order to repair the “screenshot on Mac not functioning” problem. Because you cannot be certain that your computer’s system is functioning properly if you do not know how to take a screenshot of every system.
Method 1: Take A Screenshot Of A Window
- Step 1: At the same moment, press “Command + Shift + 4” on your keyboard. To hover the cursor above the window, press the “Space” key on your keyboard as soon as you see crosshairs on your screen. Once you’ve made a decision, choose it using the mouse or trackpad. It’s critical to keep the Space bar depressed while dragging.
- Step 2: The background of your window has been tinted grey, and the Camera symbol is now noticeable. If there are numerous open windows, choose the one you want to capture from the list. To complete taking a screenshot of the contents of the window you just opened, click the mouse button one last time.
- Step 3: A “Move to Trash” option will appear when you right-click on the application icon, but you may also drag the icon to the Use your mouse to throw away.
Method 2: Take A Full-screen Screenshot
- Step 1: To begin you have to hold down the “Command + Shift + 3” keys simultaneously.
- Step 2: Your screenshot will be saved to your computer’s desktop when you hear the camera shutter sound.
Method 3: Screenshot A Section Of The Display
- Step 1: At the same moment, press the “Command + Shift + 4” keys on your keyboard. Using this shortcut will allow you to take a screenshot of a specific area of the screen.
- Step 2: After tapping the keys, a cross will appear with some numbers on it. Therefore, use the cross to take control of the desired area.
Method 4: Take A Screenshot Of A Dropdown Menu
- Step 1: After launching the menu, hold down the “Command + Shift + 4” keys and then drag the cross to where you want it to appear on the menu.
- Step 2: To take a screenshot of a specific region, “release the mouse button” and then click the “Space key” on your computer keyboard. It is possible to take a screenshot by pressing the menu button once more.
These are the procedures for taking screenshots on a Mac. Keep reading for solutions if you try all of these methods but are still unable to take screenshots.

How Can I Fix Screenshot On Mac Not Working?
Restart Your Mac
Restarting your Mac will be one of the first things you need to do. This will update the software on your device and typically resolve small bugs like this. Your Mac can be restarted in three different ways.
- After pressing the power button, select restart from the pop-up menu.
- Click on restart after choosing the Apple menu.
- Press the Control, Command, and Power buttons simultaneously.
Try to determine whether the problem still exists once the system has fully booted up.
Make Sure The Screenshot Shortcuts Are Active
Your Mac comes with shortcuts for taking screenshots turned on by default. However, occasionally this setting might be altered, making it impossible to use the Command-Shift-5 action to take a screenshot. It is therefore best to determine whether this is engaged in your system.
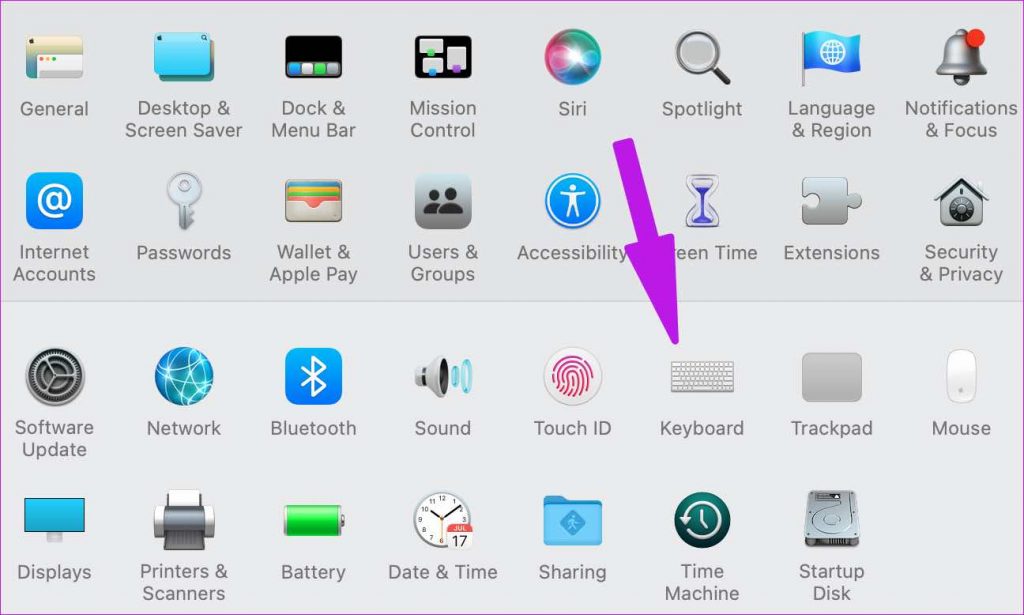
- Click on the Apple menu then select System Preferences
- Click on Keyboard
- Click on the shortcuts tab
- On the left side of the window click on Screenshots
- Verify that you’ve checked off each option.
Use Preview To Take A Shortcut
You can open and edit some files on your Mac quickly with the help of Preview. Also possible with this is a screenshot.
- Open Preview
- Click on File then choose Take Screenshot
Do An NVRAM Reset
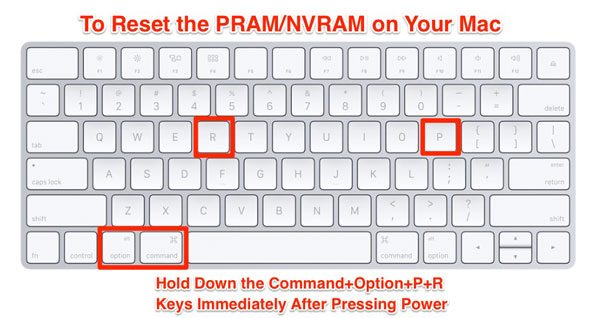
It’s a form of computer memory called “NVRAM” that keeps track of things like the level of your sound, time zone, and screen resolution. The NVRAM can be reset to solve a number of issues, including the inability to Mac screenshots. So, let’s reset it.
- Step 1: Your Mac will shut down and restart when you press the power button.
- Step 2: Hold down “Command + Option + P + R” on your keyboard for around 20 seconds after you hear the starting sound.
We believe that this will help you with your issue. Try the next option if the first doesn’t work.

Load In Safe Mode
Sometimes malware on your computer prevents screenshots from working. Open your Mac in the short mode in order to learn for sure.
- Step 1: After your Mac has been turned off, wait a full 10 seconds before restarting it.
- Step 2: As soon as the Mac has restarted, press and hold Shift. Release the key when you see the login screen.
- Step 3: Now, you can see “Safe Boot” on the top of the display after logging in.
- Step 4: Now attempt to take screenshots, but if that still fails, attempt to clean your computer of malware. The screenshot feature should then begin to function, in our opinion.
Check Your Mac For Malware
You might discover that using your Mac to take screenshots is impossible if your laptop is infected with malware. You must act immediately if you even have the remotest suspicion that this is the case. In order to remove malware, uninstall programs, clean up and optimize your Mac, you may use “CleanMyMac X” to do so.
Using Setapp, you may search for “CleanMyMac X” in the app to discover and install this app. Open the app, select “run,” then search for malware, get rid of it, and try to take a screenshot.
Use Grab To Screenshot On Mac
There are additional methods for taking screenshots on a Mac that you might not be aware of. In order to capture the screen on your system, use Grab rather than the keyboard shortcuts for screenshots. You can take screenshots of your entire screen, all of your windows, or just a specific portion of your screen using the pre-installed Grab application for Mac OS X and macOS.
Here are the simple steps on how to use Grab utility to take screenshots on Mac:
- Step 1: To start with, you need to open “Applications” and next, tap on “Utilities”.
- Step 2: After that, look for “Grab” and select it.
- Step 3: Now, click on “Capture”.
You can select any option and take a screenshot based on your needs.
Use Native Utilities
You might wonder what native utilities are. This is a tool that is already there to take screenshots.
- Step 1: You can locate it under Finder > Applications. At the top of your screen, the Preview menu will be visible.
- Step 2: Click “Command + Shift + 5”, or go to utilities by selecting “Finder > Applications > Utilities”.
- Step 3: By clicking the Screenshot icon, you can take a screenshot. Numerous options for altering the display can be found on your screen.
- Step 4: Go to Options > Screenshot Location to check and, if necessary, change the default location of your screenshots. Select one of the screenshot icons from the menu below to take a screenshot.
Check The Keyboard Settings
We should double-check Mac’s keyboard settings because sometimes they can be disabled.
- Step 1: At first using your Dock Apple menu, select “Then select System Preferences.”
- Step 2: Then, You will find “Keyboard”, then turn towards “Shortcuts”.
- Step 3: Once you have a few choices, pick them all to save it and try to capture screenshots.
Confirm The Location Of Saving Mac Screenshots
You may be aware that any screenshot you take on a Mac by default remains on the desktop. You might not be able to locate the screenshot if you ever changed the location. Let’s try to locate the Mac’s saving location now.
- Step 1: First of all launch the screenshot app from the “Option”.
- Step 2: Now pay close attention to the saving location and change it to desktop.
How Can I Get Back Screenshots That Were Deleted Or Lost On My Mac?
In some cases, although screenshots are saved by resolving the problem “screenshot on Mac not working”, there are chances that you still lost them due to unknown reasons. But if this happens to you, don’t freak out because there’s still a powerful way to recover your deleted screenshots on your Mac. Utilizing Recoverit data recovery for Mac is that method.

